


You found a Facebook video you want to keep, whether it’s a useful tutorial, a memorable clip, or something you’d like to watch offline. But after tapping Save, there’s no video in your gallery or Downloads folder. Facebook has saved the post, not the actual file.
If you’re wondering how to save a Facebook video directly to your device, this guide covers three methods. You’ll learn how to download your own videos, save public videos you have permission to download, and use screen recording when direct downloads aren’t available.
Quick Verdict
Before getting into the detailed steps, it’s helpful to know which method works best for your video. The right choice depends on whether you uploaded it yourself, whether it’s publicly accessible, and whether you can download the original file. The comparison below will help you choose the most suitable option.
| Method | Best For | What You Get |
| Facebook’s Official Download | Videos you’ve uploaded yourself | A video file without third-party tools |
| Online Video Downloader | Public videos you have permission to download | A downloadable video file |
| Screen Recording | Videos you can watch and have permission to record but cannot download | A recording saved to your device |
If you’re saving your videos before deleting your Facebook account, downloading your own uploads is more reliable than keeping them in Facebook’s Saved collection.
1: Save Your Own Videos Directly from Facebook
Facebook’s official download feature is a good option for saving videos you’ve uploaded yourself, including regular posts, Reels, and available Live replays. You can export multiple videos at once through Accounts Center, without using a third-party downloader. The downloaded archive contains your selected media, typically including MP4 video files.
Here’s how to save a video from Facebook using its official export feature:
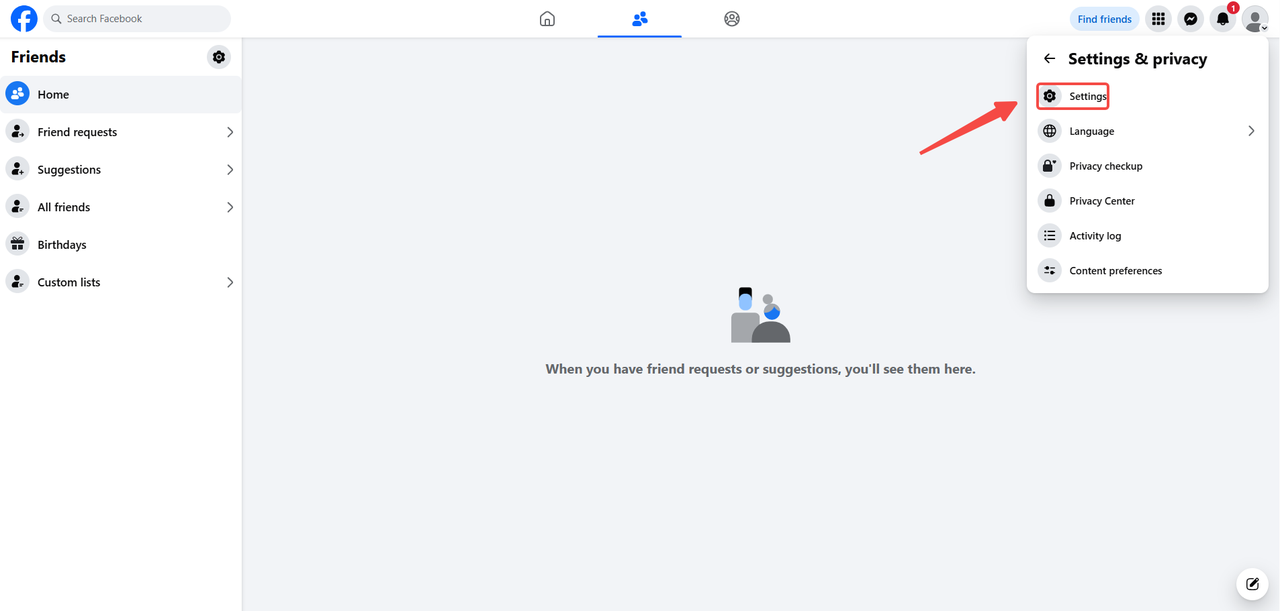
Step 1. Log in to Facebook, click your profile picture, select Settings & privacy, and then open Settings.
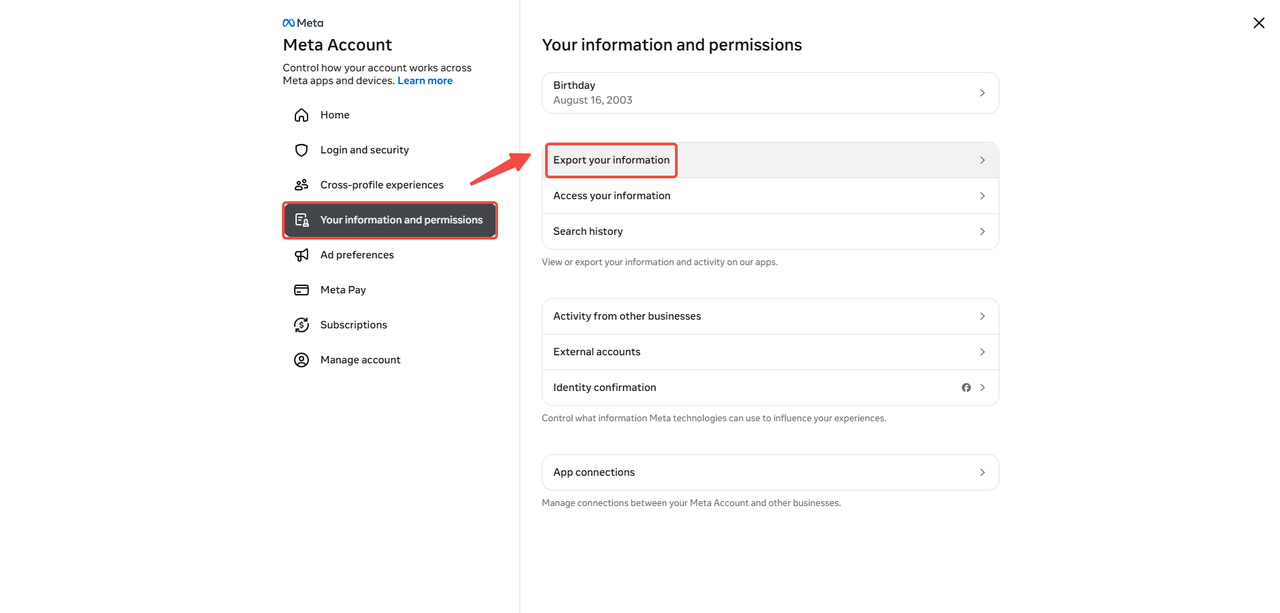
Step 2. Open Accounts Center, select Your information and permissions, then click Export your information (formerly Download your information).
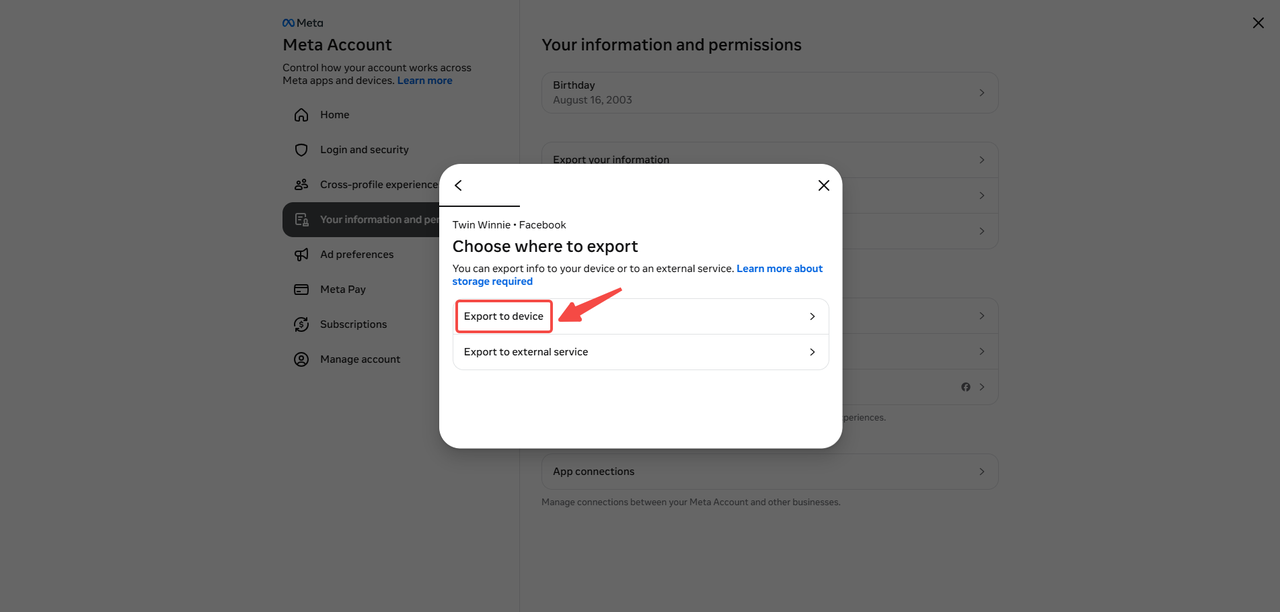
Step 3. Click Create export, choose your Facebook profile, and select Export to device. Under the information categories, include Photos and videos, Posts, or Reels, depending on what you want to download.
Step 4. Choose your preferred date range, file format, and media quality. Select High for the best available export quality, then click Start export.
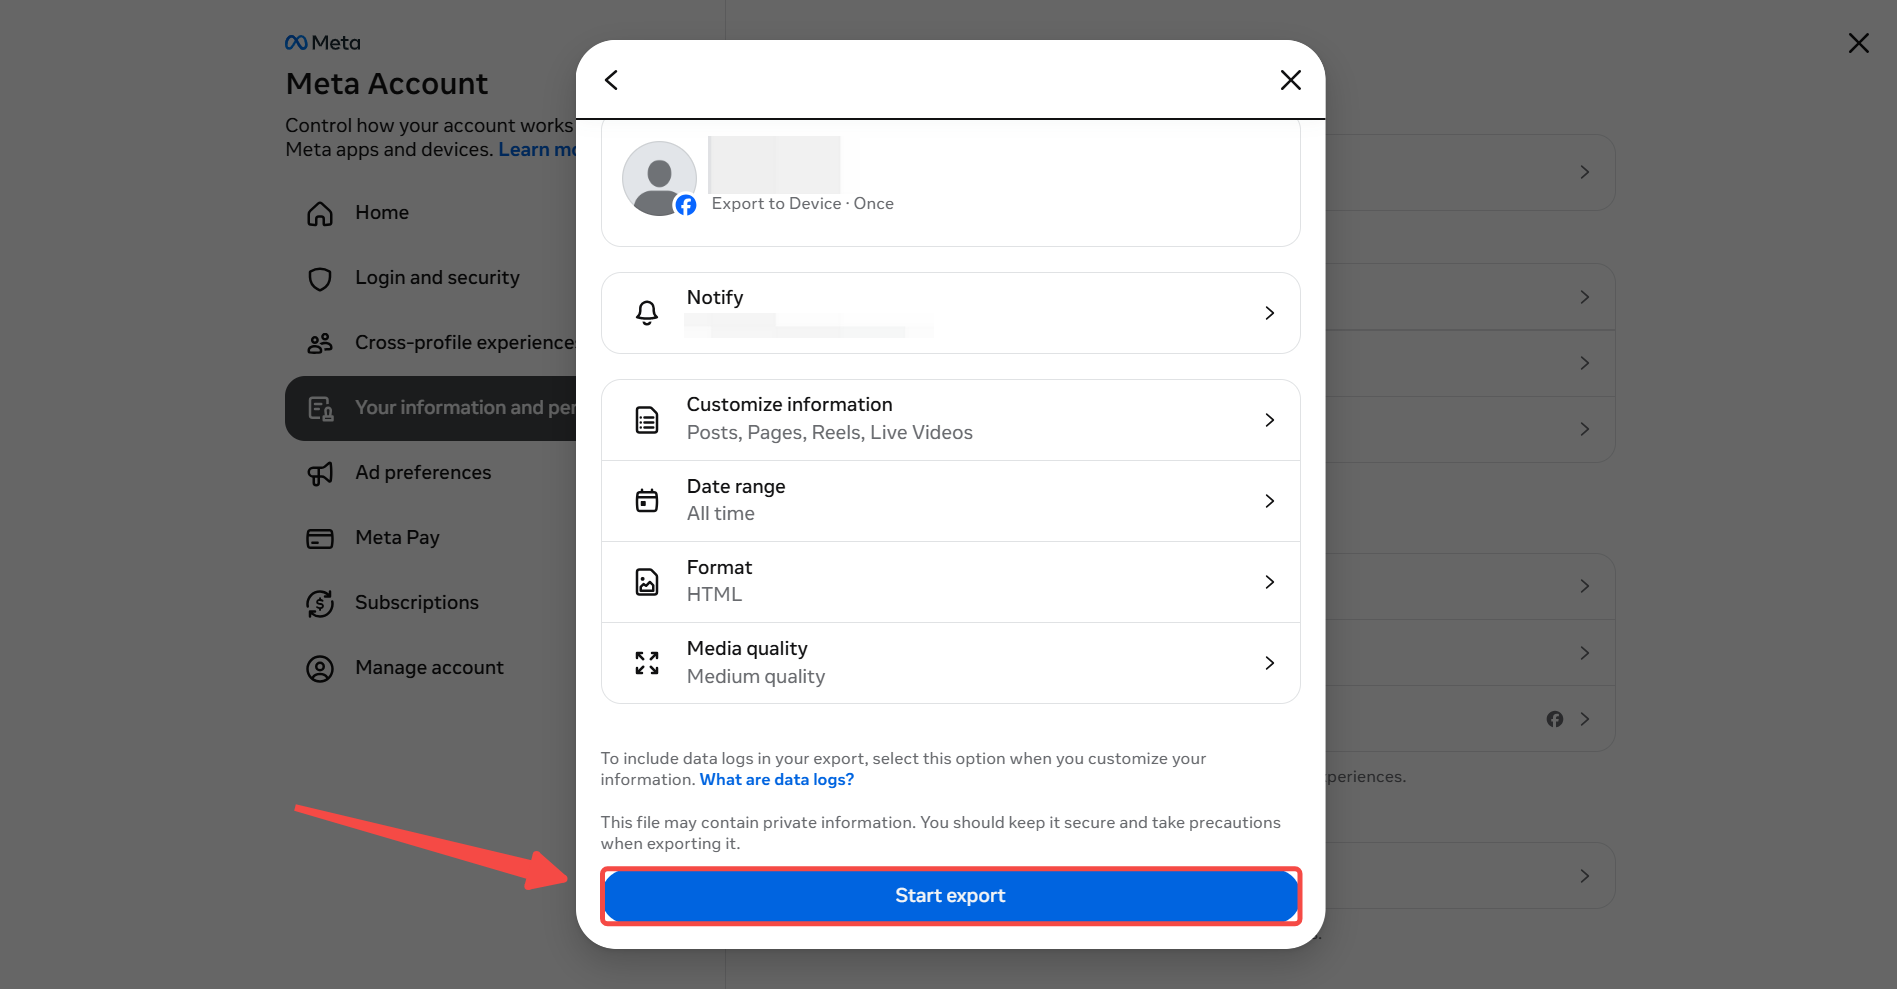
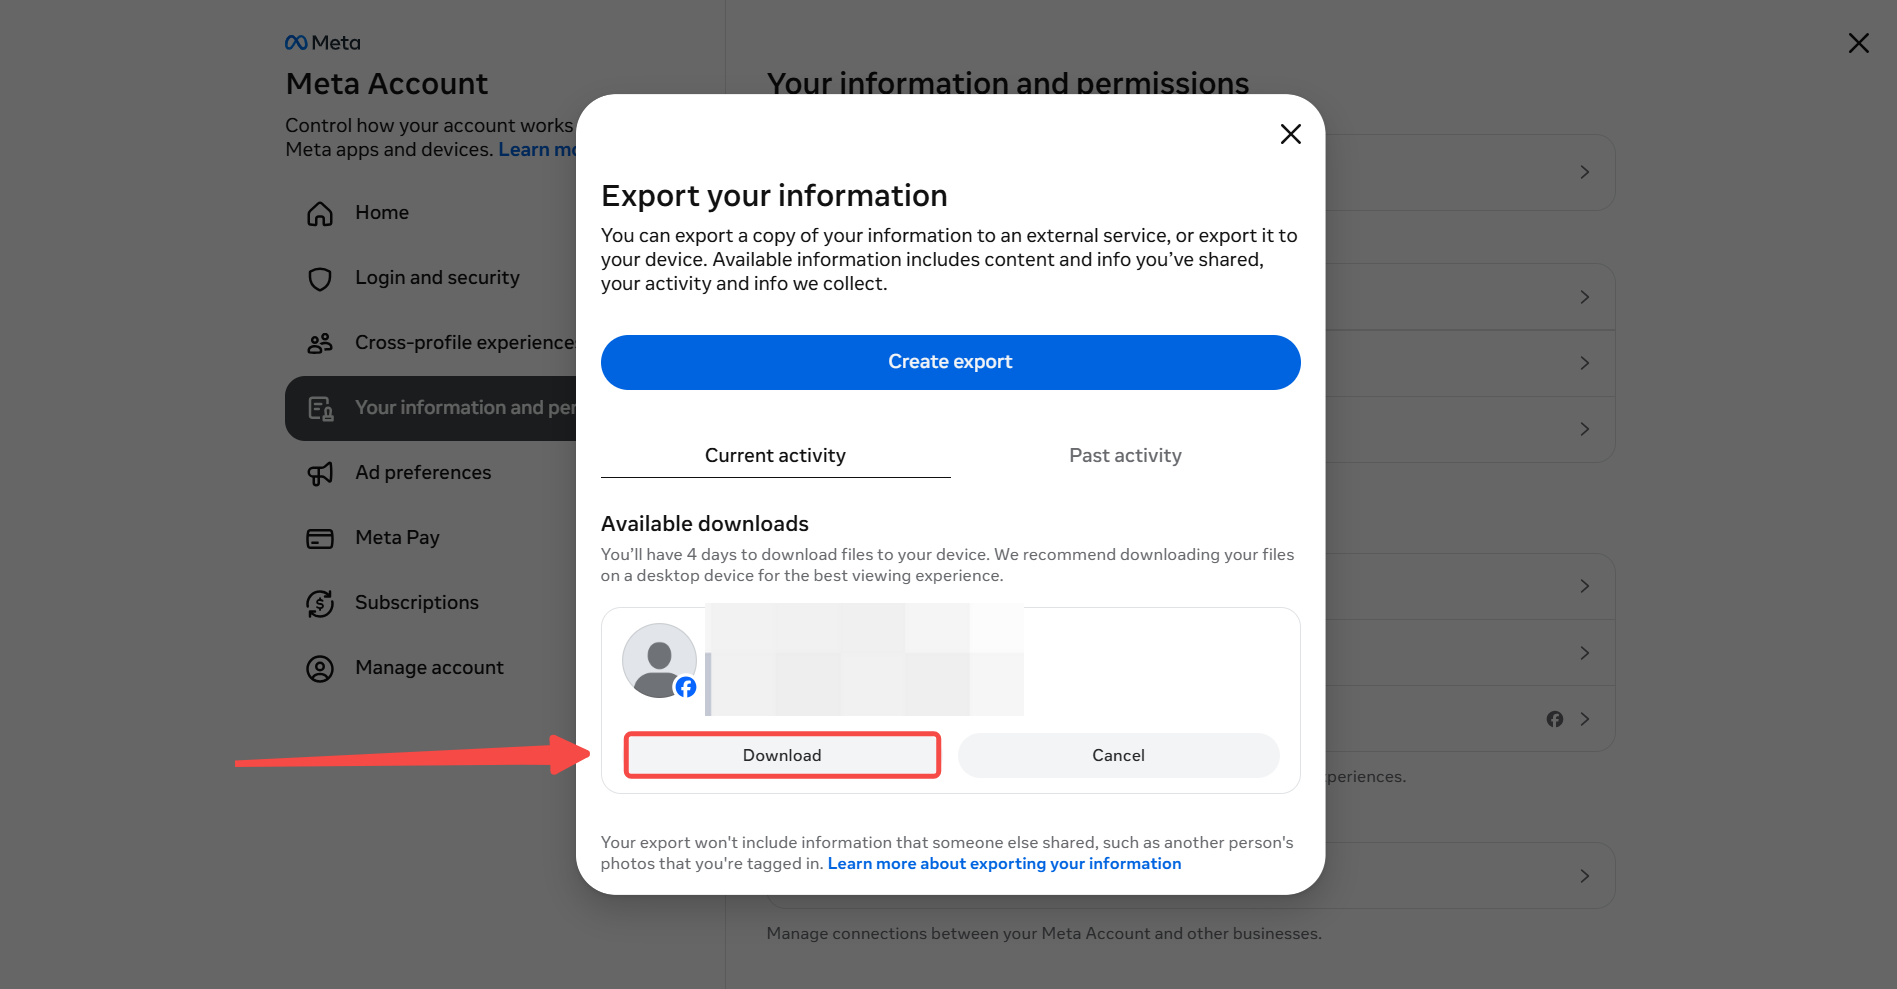
Step 5. Once Facebook notifies you that the export is ready, return to Available downloads and download the ZIP archive. Extract the folder to find your videos.
For individual Reels you’ve posted, the Facebook mobile app may offer Download Reel in the video’s options menu. For Live replays, Meta’s official download guide explains how to download Facebook Live video from your profile or Page.
Facebook generally removes new Live recordings after 30 days, so these downloads have a limited window. Selecting High quality for an export does not guarantee the original upload resolution.
2: Download Facebook Videos with an Online Downloader
Facebook’s built-in download options are mainly intended for videos you’ve uploaded yourself. To save public videos shared by others, you can use online downloaders such as SaveFrom and FDOWN, provided you have permission. These tools use the video link to retrieve available files, usually in MP4 format.
This example uses FacebookSave, a free online Facebook Reel downloader that also supports regular videos, Watch clips, and available Live replays. It offers SD and HD options without requiring a subscription, software installation, or Facebook login. The website lists no fixed limits on download counts or video file sizes. In its own tests, direct video links took an average of 1.63 seconds to process, compared with 3.45 seconds for Watch links.
The following steps explain how to download a Facebook video with FacebookSave:
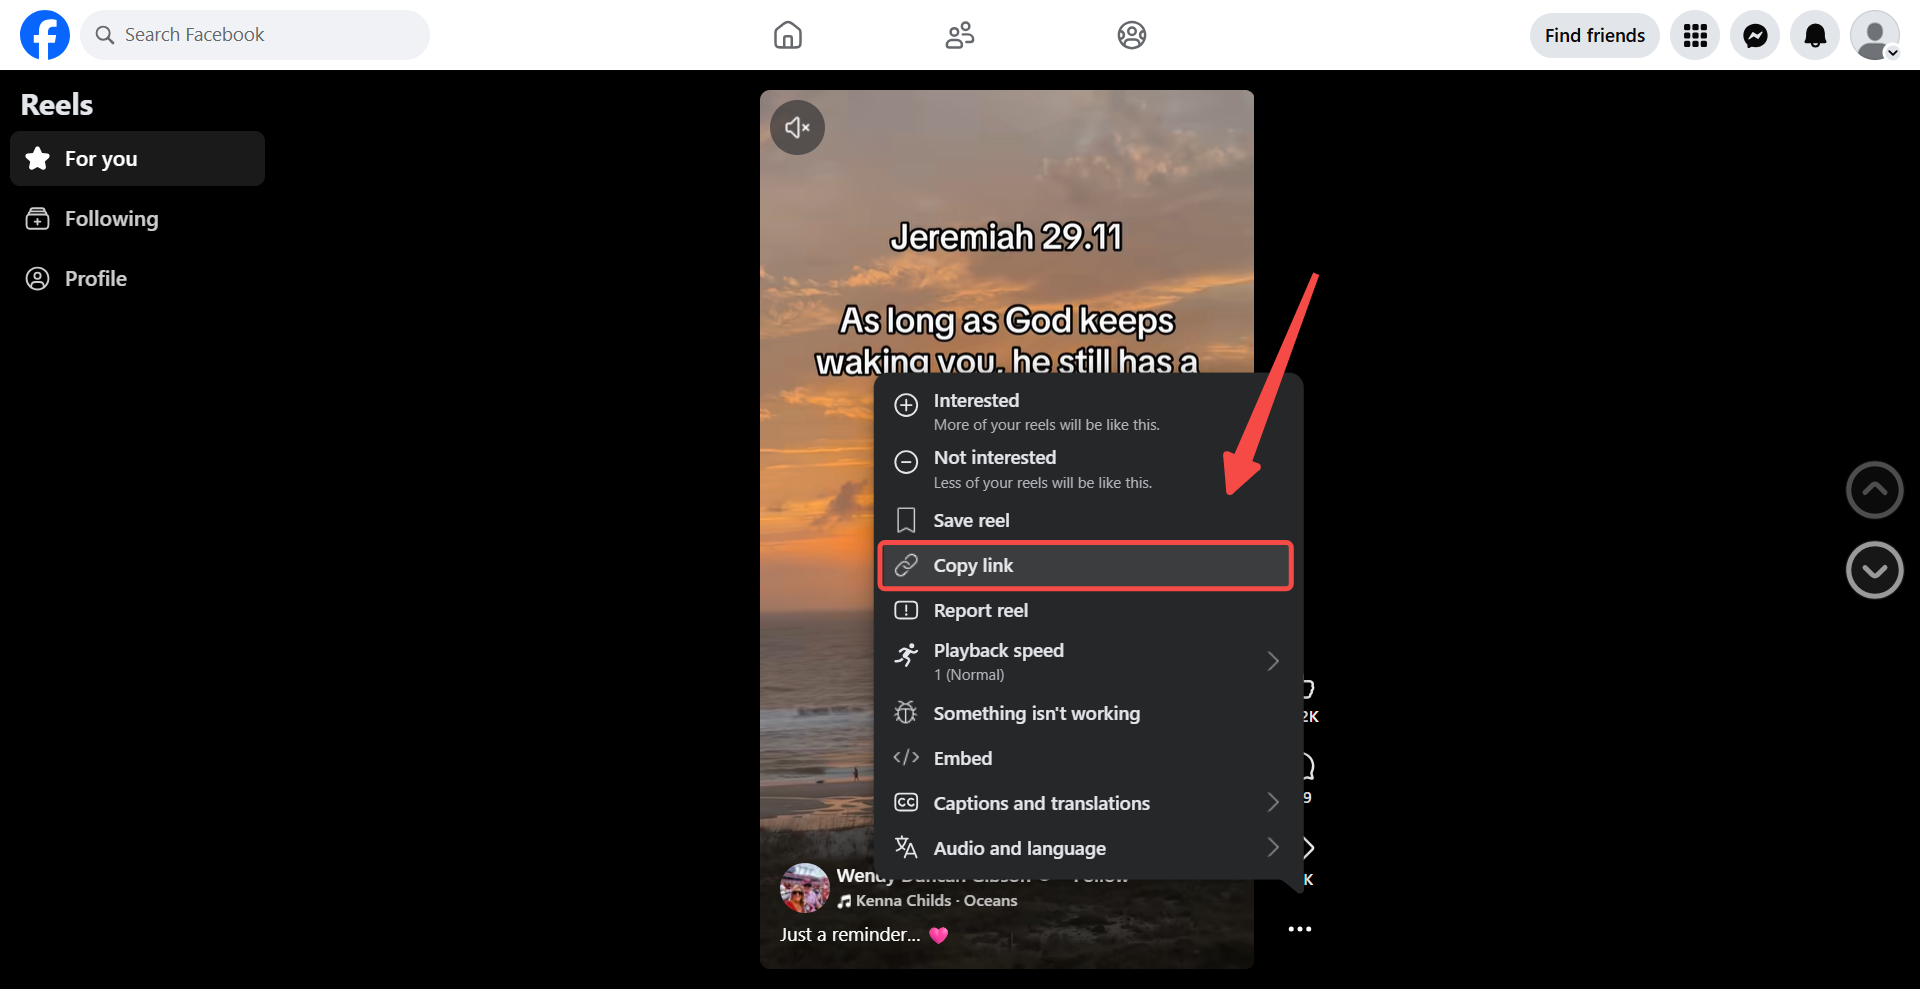
Step 1. Open the Facebook video you want to download, click or tap Share, and select Copy link to get its URL.
Step 2. Visit the FacebookSave Online Downloader in your browser and paste the copied URL into the input field.
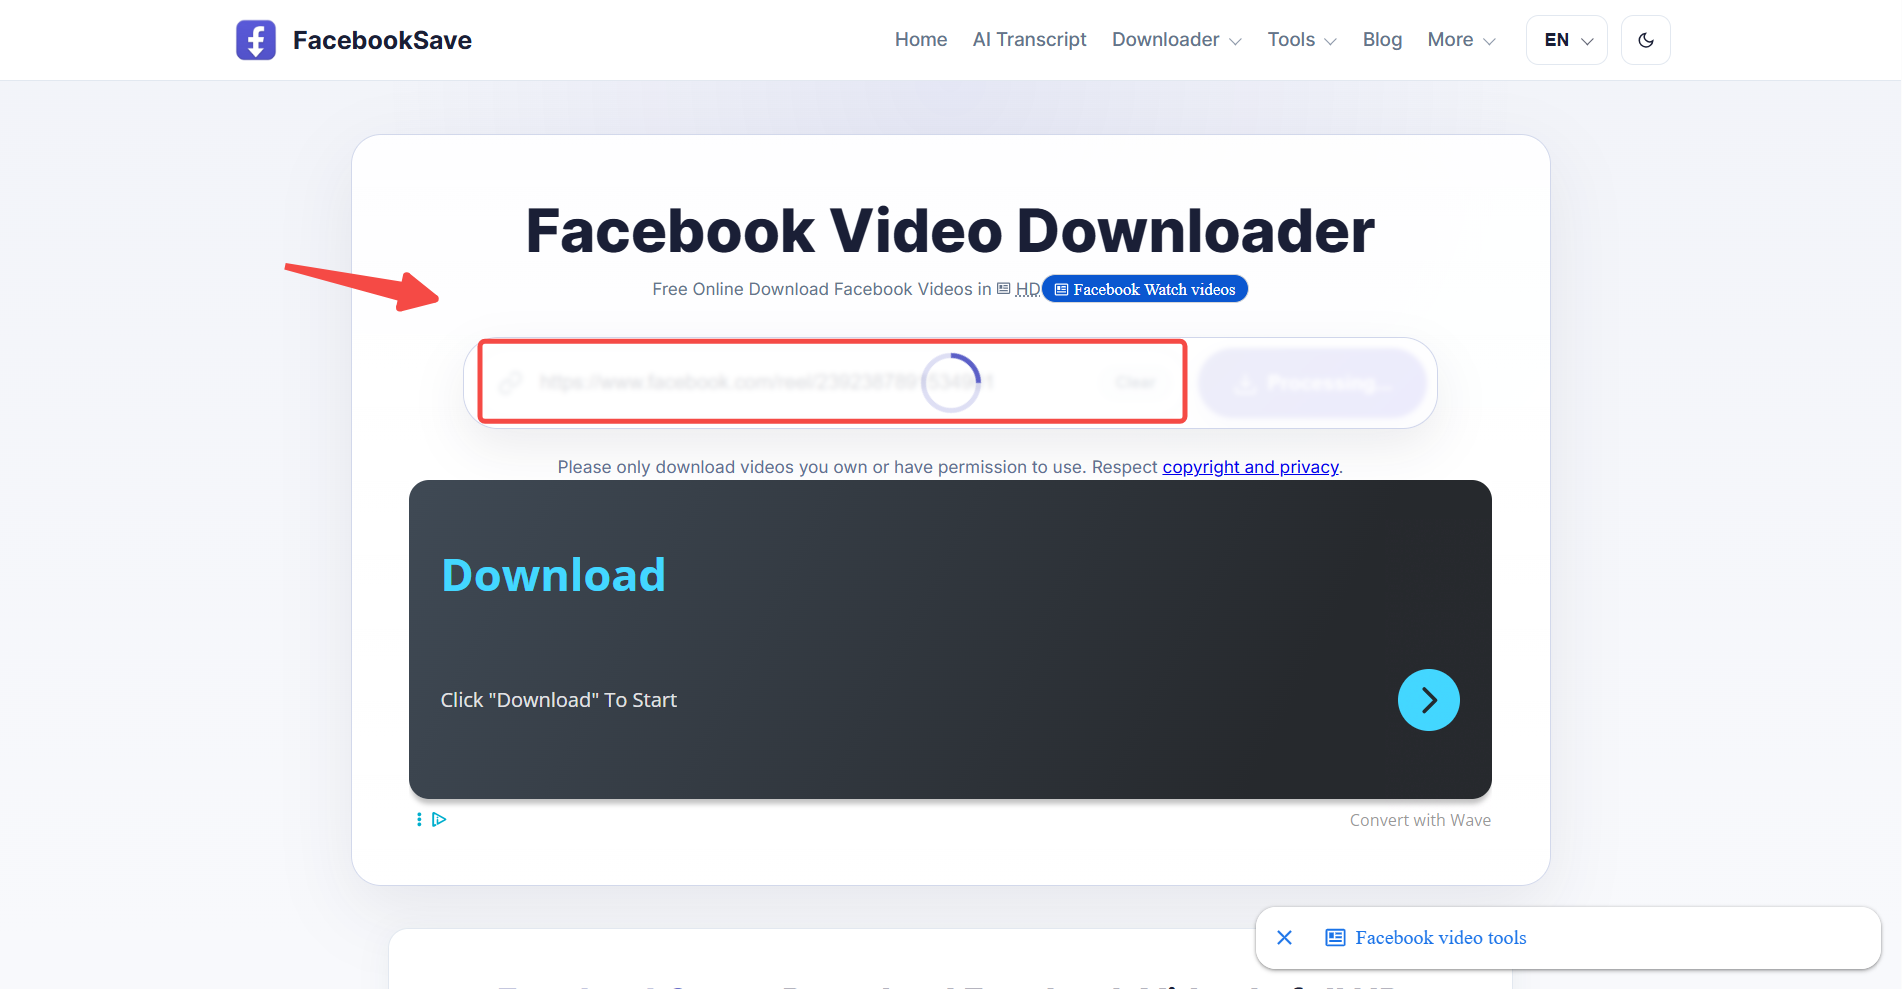
Step 3. Click Download and wait for the available video formats to appear. Choose HD for higher quality or SD for a smaller file.
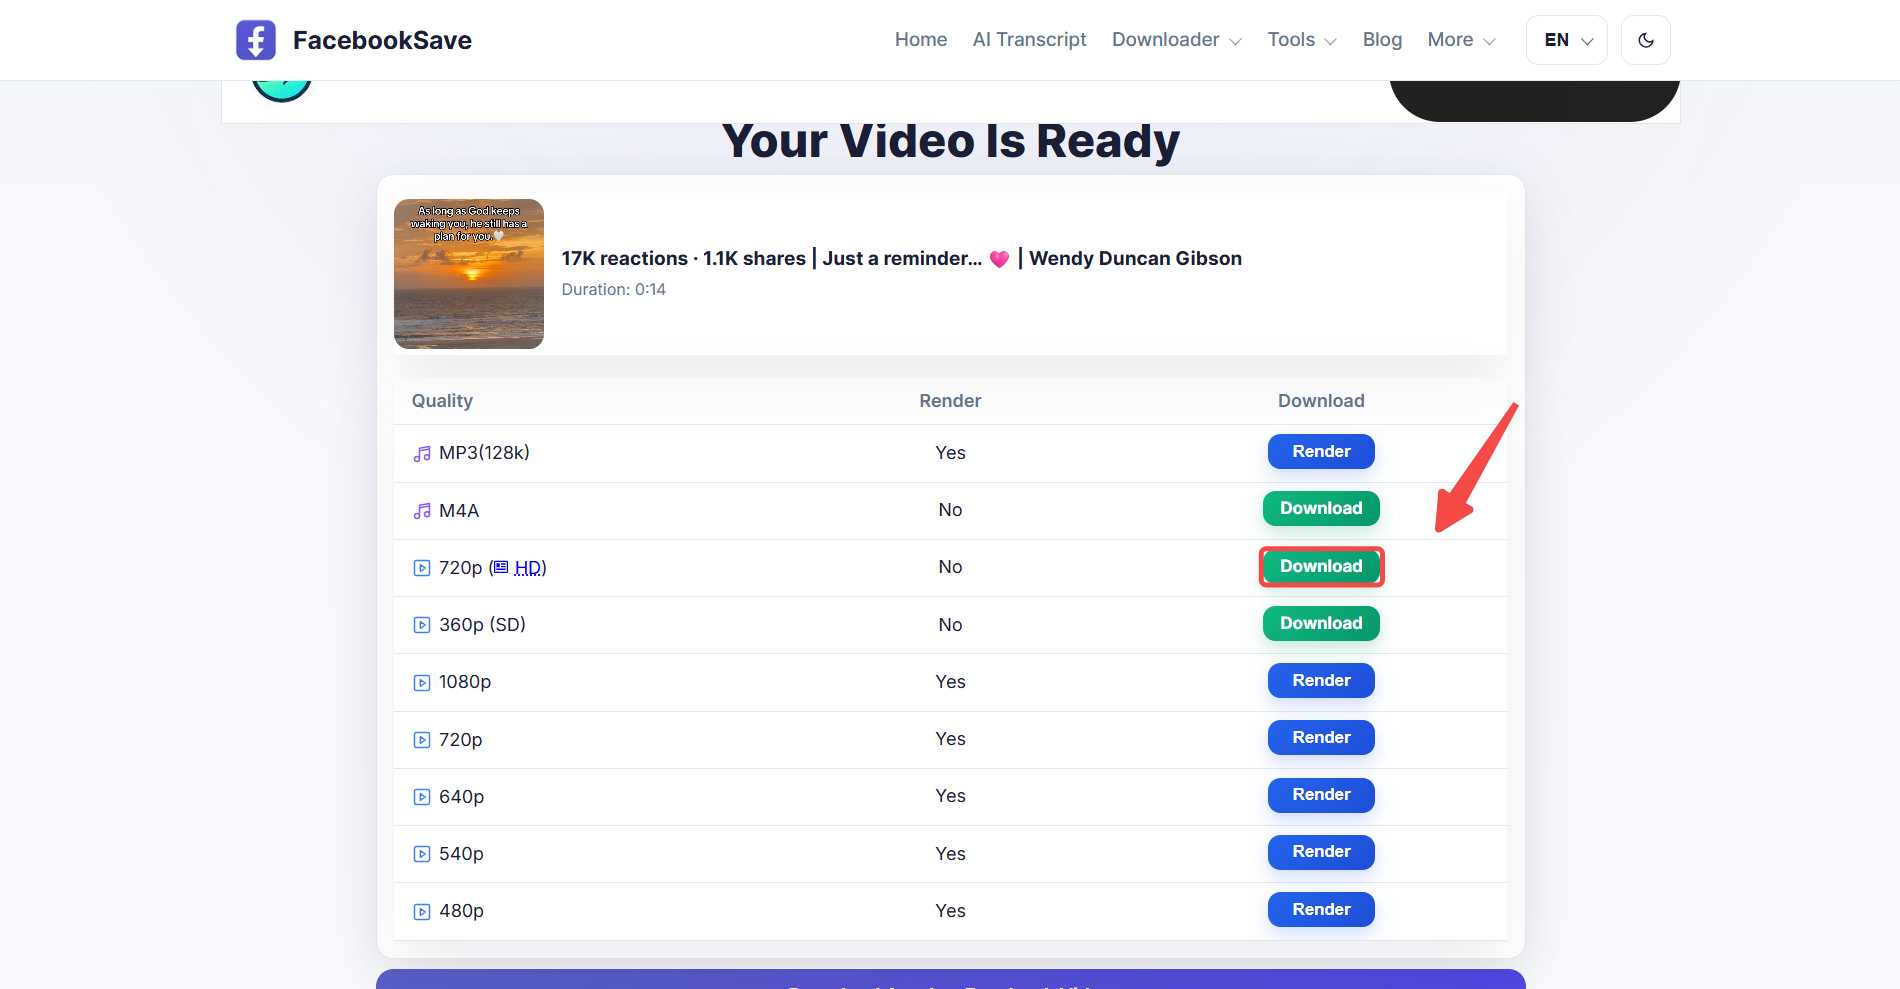
Step 4. Select the desired download option and save the video to your device. Your browser may ask you to confirm the download or choose a folder.
The same steps work on computers and phones, although file locations vary. On Windows and Mac, videos usually appear in the Downloads folder. On iPhone, you can find the downloaded video in Files, tap Share, and select Save Video to move it to Photos. Android users can usually find their videos in the Downloads folder through Files or another file manager.
For More Tools to Save Videos
Other online downloaders, such as SaveFrom and FDOWN, are worth considering when FacebookSave cannot process a public video link. They offer similar download methods, although supported video types and quality options may differ.
However, do note that online downloaders generally work best with publicly accessible videos. Private posts and restricted content may not provide downloadable files, even when you can watch them on Facebook.
3: Save Facebook Videos Using Screen Recording
Screen recording is another way to save someone else’s Facebook videowhen you have permission to record it but cannot download the original file. This method works for regular Facebook videos, Reels, and accessible Live replays. Unlike direct downloading, it captures the video as it plays rather than retrieving the original MP4 file.
You can save Facebook videos on your phone using the built-in screen recording feature on iPhone or Android.
You can use your phone’s built-in screen recorder to save Facebook videos without installing additional apps. The steps are similar on iPhone and Android.
Step 1. Open the Facebook video and pause it at the beginning. On iPhone, swipe down from the top right corner to open Control Center. On Android, swipe down twice to access Quick Settings.
Step 2. Tap Screen Recording on iPhone or Screen Record on Android. Start recording, then return to Facebook and play the video.
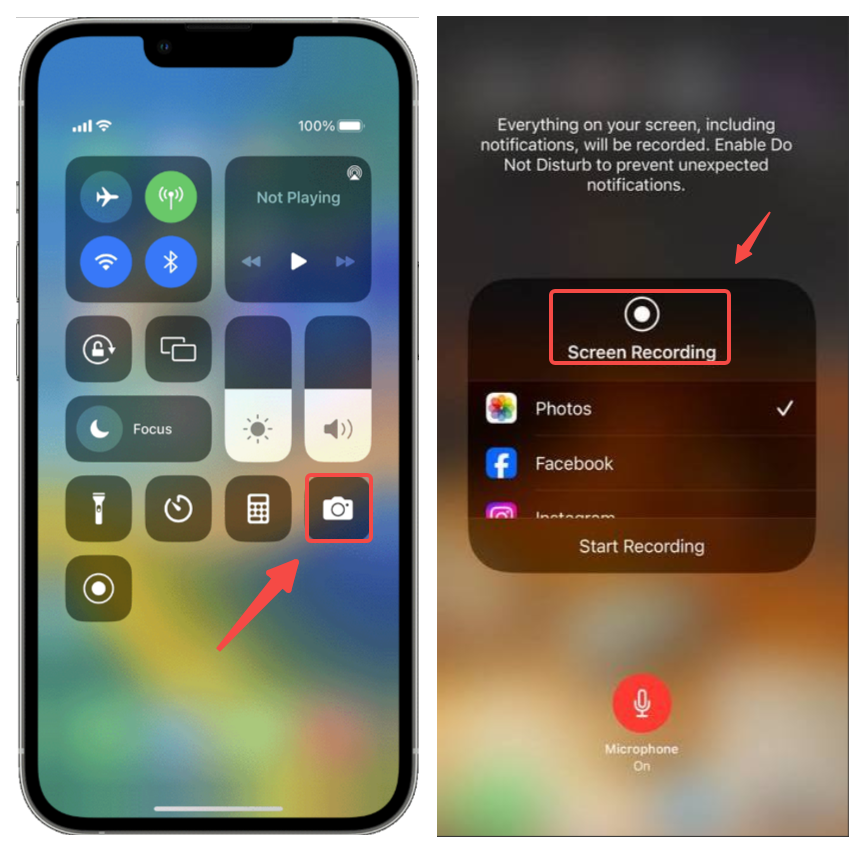
Step 3. Stop the recording once the video finishes. On iPhone, tap the red recording indicator and select Stop. On Android, use the screen recording notification. Your video will usually appear in Photos on iPhone or Gallery on Android.
On a computer, you can record videos using the Snipping Tool on Windows 11 or the built-in screen recording controls on Mac, accessed by pressing Shift, Command, and 5. Screen recording may reduce video quality, and some apps restrict audio capture. The saved recording may not match the original video’s resolution or sound quality.
For Facebook photos, the Facebook picture download guide covers ways to save images directly without recording your screen.
Common Facebook Video Download Problems and Fixes
Facebook videos can play normally but still fail to download. Even after learning how to download Facebook Reels orLive videos, you may encounter problems with private posts, unsupported links, or unavailable recordings. Identifying the cause is the first step toward resolving the issue.
The table below covers common download problems, their possible causes, and practical solutions.
| Problem | Possible Cause | Solution |
| Invalid video link | Incorrect or expired URL | Copy the video link again from Facebook. |
| Video unavailable | Private, restricted, or deleted post | Check access permissions or ask the creator for a copy. |
| Download button not working | Browser or website issue | Try another browser or check device storage. |
| Facebook Reel won’t download | Unsupported Reel format or restricted access | Try a downloader that supports public Reels. |
| Live video won’t download | Replay unavailable or expired | Check whether the replay is still accessible. |
| Download fails midway | Unstable connection or insufficient storage | Check your connection and free up storage space. |
Video Quality, Watermarks, and File Locations
Video quality depends on how you save the file. Facebook’s official export feature offers a High media quality setting, while online downloaders may provide SD or HD options based on the available video. Screen recording captures the playback on your device, which can result in lower resolution or reduced audio quality.
For a free Facebook video download without a watermark, some online tools can save videos without adding their own branding. However, watermarks or creator logos already embedded in the original video will remain. A watermark-free result is not guaranteed for every video.
Where the file ends up also depends on how you save videos from Facebook to your phone or computer. The table below shows the most common locations.
| Device | Common File Location |
| Windows | Downloads folder in File Explorer |
| Mac | Downloads folder in Finder |
| iPhone | Downloads folder in Files; screen recordings in Photos |
| Android | Downloads folder in Files; screen recordings in Gallery or Google Photos |
Browser settings can change the default download location. Videos saved through screen recording may appear in a different folder from files downloaded directly.
Final Verdict
Knowing how to save a Facebook video comes down to choosing the right method for the content. Facebook’s official download feature works best for your own uploads, while online downloaders can save public videos you have permission to download. Screen recording is another option for videos you can watch but cannot download directly. The final result depends on the video’s accessibility, format, and available quality. Choosing a method that matches the video type helps you save a file you can access offline.


2 comments