



Saving hundreds of pictures individually takes time, especially when they’re stored in Facebook posts and albums from different years. You might want to back up images that are no longer on your device or preserve your collection before deleting your account.
Facebook’s built-in export tool supports bulk downloads of your uploads, but finding the right settings can be confusing. Content posted by others and tagged with your name may not be included either. This guide explains how to download all Facebook photos on a computer or phone, save individual albums, and handle tagged pictures. You’ll also learn how to open the downloaded archive and check for missing files.
Facebook Pictures Download Options at a Glance
The best way to download Facebook photos depends on whether you want your entire collection, a specific album, or pictures uploaded by someone else. Facebook’s built-in export tool works on both computers and phones, while other options are better suited to specific needs.
| What You Want to Download | Recommended Method | Supported Devices |
| All photos you’ve uploaded | Facebook’s Export Your Information | Computer |
| All uploaded images on your phone | Facebook app via Accounts Center | iPhone and Android |
| Photos from a single album | Download Album, if available | Computer |
| Pictures you’re tagged in | Tagged Photo Exporter extension | Computer with Chrome |
Facebook’s official export tool is free and is the preferred option for downloading your own photos in bulk. The album download option may not appear for every account, while third-party extensions can help with tagged Photographs but require additional privacy considerations.
Method 1: Export Your Entire Photo Collection on a Computer
Facebook’s built-in export your information feature supports bulk downloads of your uploaded pictures without installing additional software. Meta’s official export guide provides more details about this feature. You can access it through Accounts Center or Meta Account settings, depending on your interface.
Here’s how to download all Facebook photos on a computer:
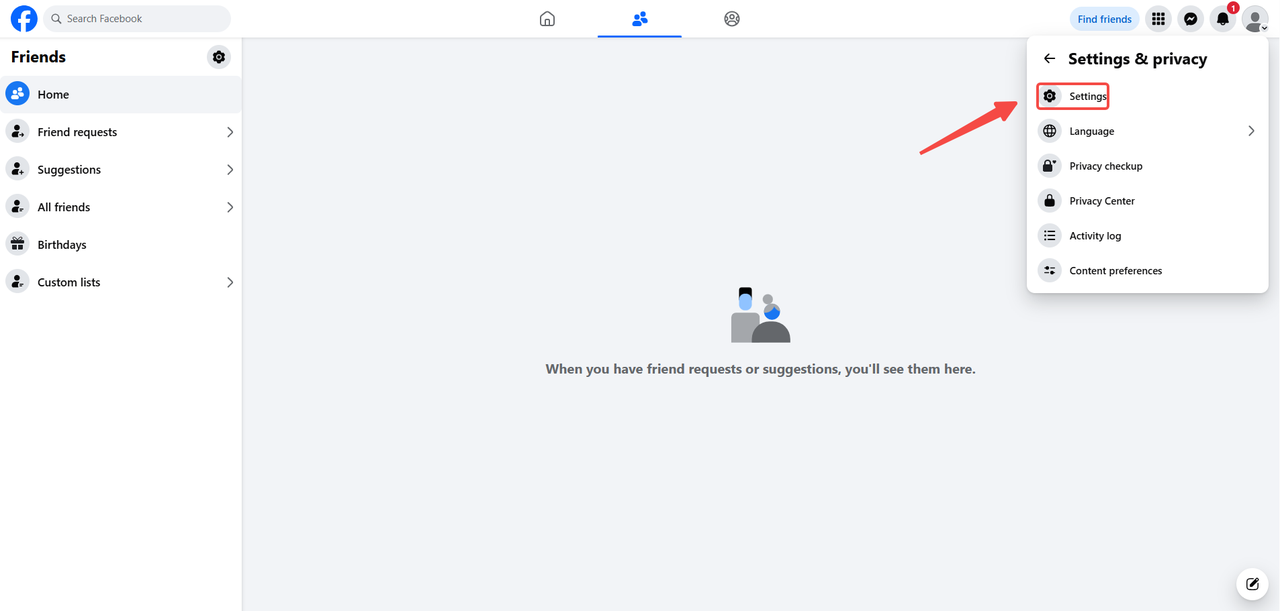
Step 1. Sign in to Facebook, click your profile picture in the upper-right corner, and open Settings & privacy. Then select Settings.
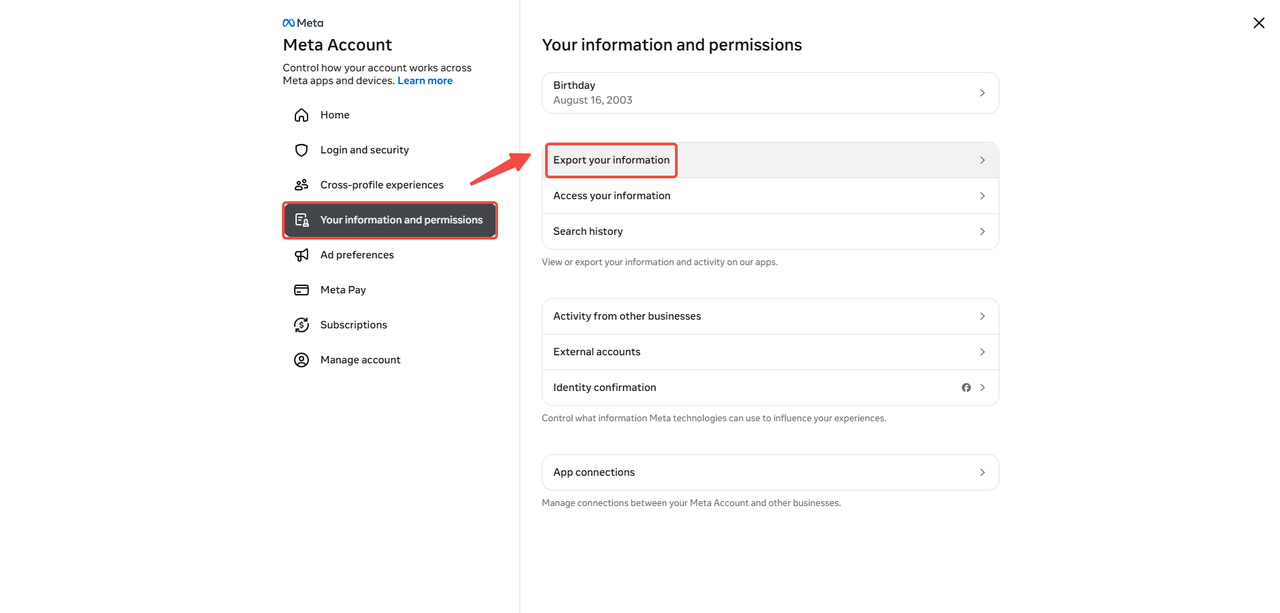
Step 2. Go to Accounts Center (or Meta Account, if shown). Under Your information and permissions, find Export your information and click Create export.
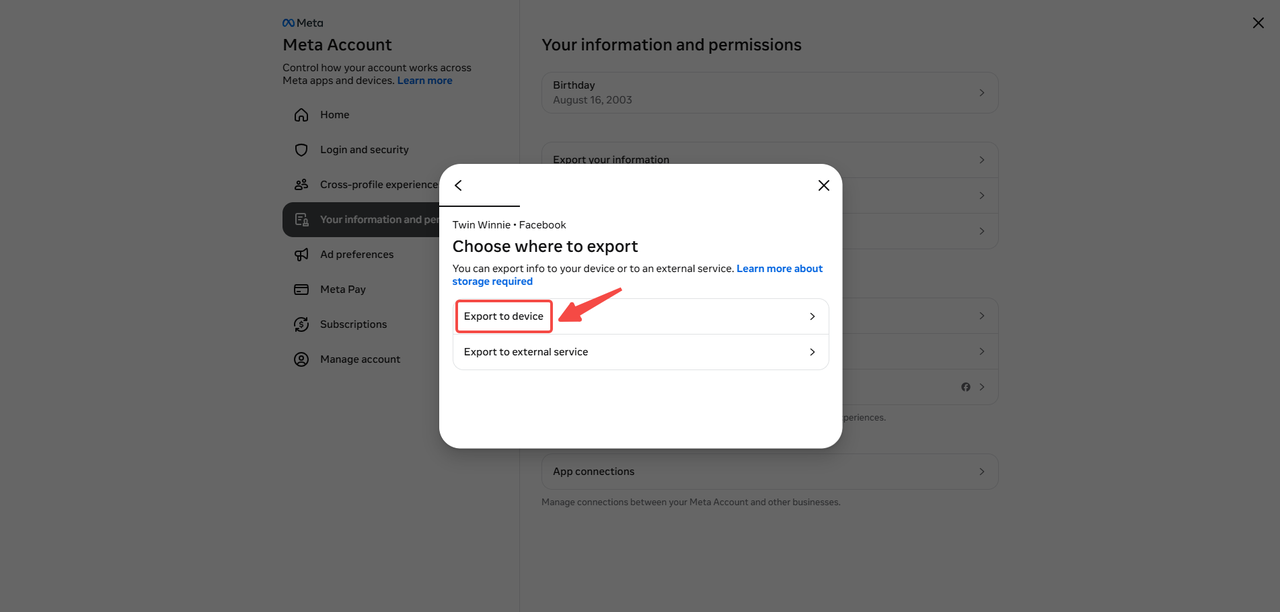
Step 3. Choose the Facebook profile containing your images and select Next. Then pick Export to device to store the files locally.
Step 4. Under the information categories, select Photos. Set the date range to All time, media quality to High, and file format to HTML.
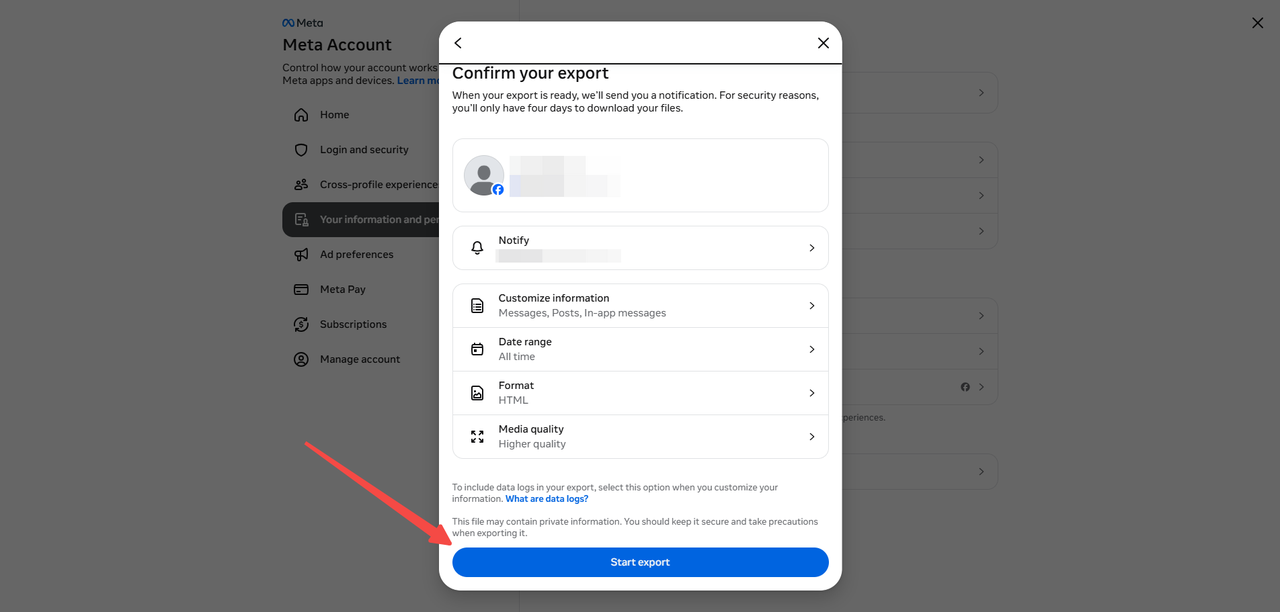
Step 5. Click Create export and wait for Facebook to notify you when the archive is ready. Return to the export page, open Available downloads, and save the ZIP file to your computer.

For personal backups, HTML is generally preferable to JSON because it provides a format you can browse. JSON is more suitable for processing structured data with other software.
Method 2: Save Facebook Images Using the Mobile App
If you’re looking for a Facebook download-all-images option on your phone, the mobile app doesn’t have a single button to save your entire collection to the gallery. However, you can export your uploaded pictures in bulk on both iPhone and Android using the same account feature available on a computer.
Step 1. Open the Facebook app and tap Menu, usually in the bottom-right corner on iPhone or the upper-right corner on Android.
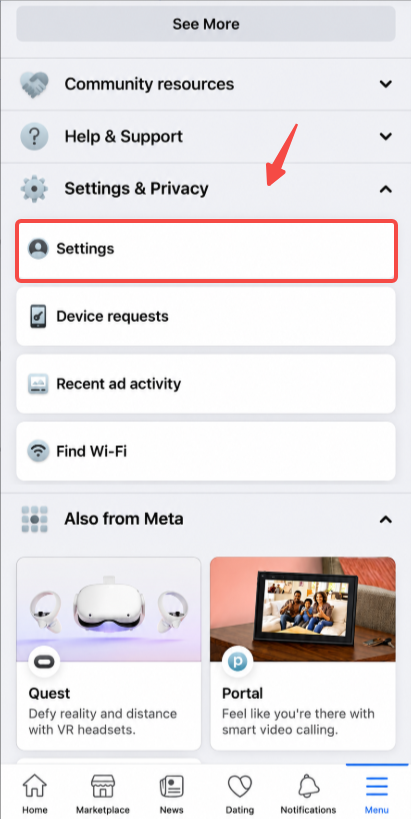
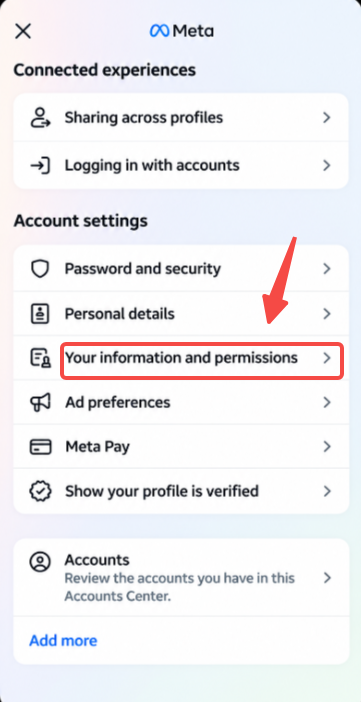
Step 2. Select Settings & privacy, then Settings. Open Accounts Center (or Meta Account) and find Export your information under Your information and permissions.
Step 3. Tap Create export, select your Facebook profile, and choose Export to device. Follow the settings in Method 1 to customize your request. Once the archive is ready, save the ZIP file to your phone.
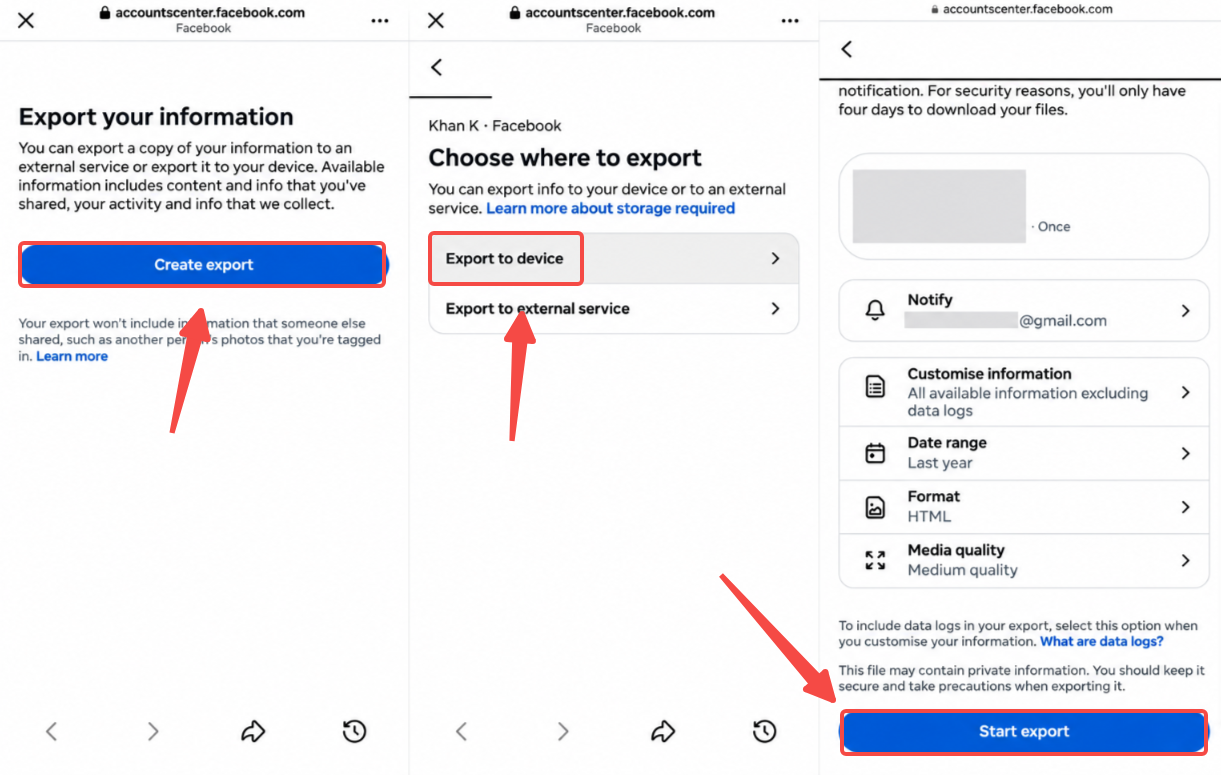
The downloaded package is typically stored in the Files app on iPhone or the Downloads folder on Android, rather than appearing automatically in your gallery.
For cloud backups, Facebook may offerExport to external service, with destinations such as Google Photos or Dropbox. iCloud isn’t listed as a direct transfer option. On iPhone, you can instead import the extracted images into your device’s library and sync them through iCloud.
Method 3: Get a Whole Album Without Exporting Everything
If you only need pictures from a vacation, family event, or another specific collection, exporting your entire Facebook history is unnecessary. On a computer, you may be able to download Facebook albums you’ve created directly from your profile.
Step 1. Open Facebook in your desktop browser, go to your profile, and select Photos.
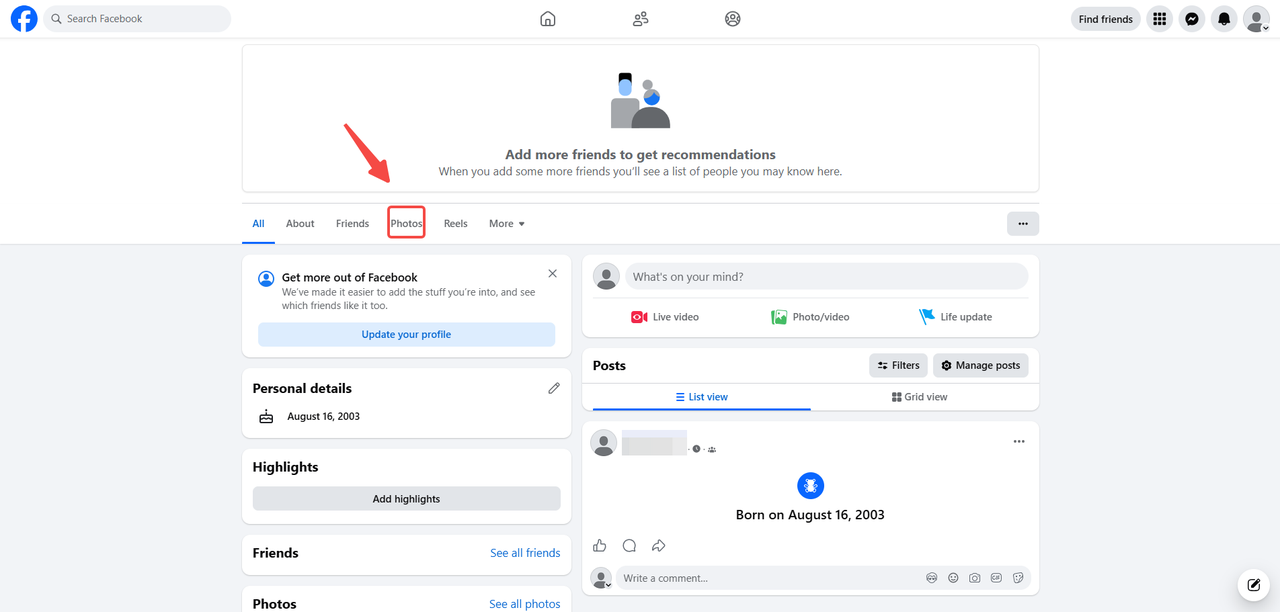
Step 2. Click Albums and open the collection you want to save. Look for the three-dot menu near the top of the page. If the Download album option appears, select it to request a copy.
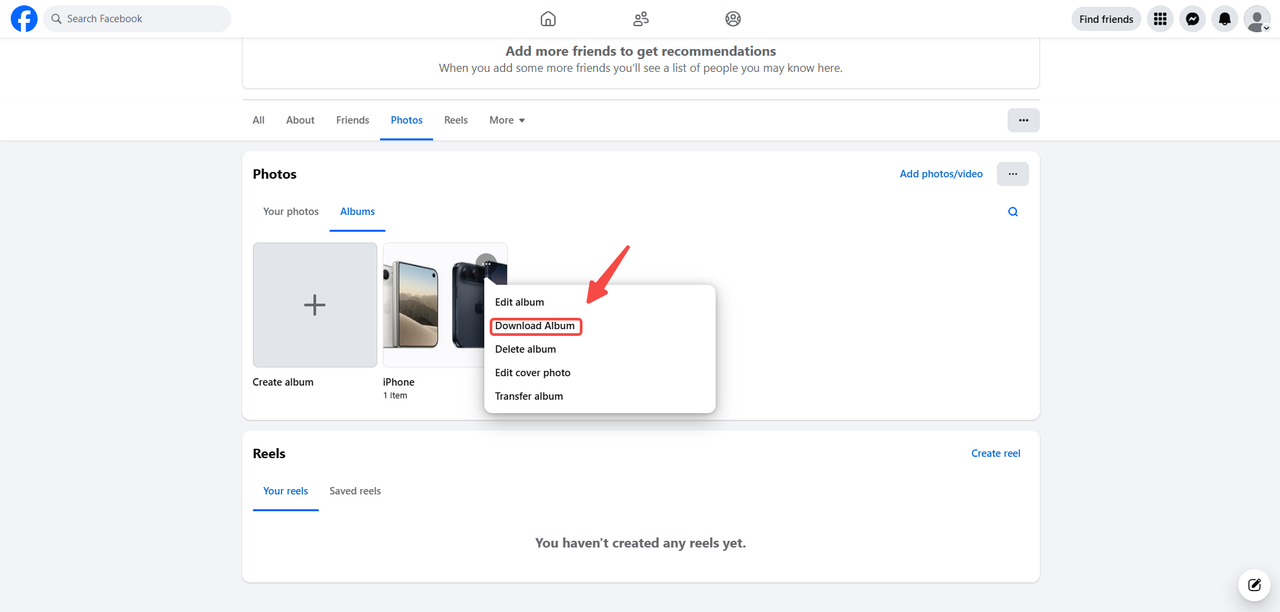
What if Download album is missing? This option isn’t available for every account or album type. For a small number of images, each one can be saved individually using Download from its options menu. For larger collections, Facebook’s official export tool is a more practical alternative, although finding the relevant files afterward requires some manual sorting.
Method 4: Download Tagged Photos With a Chrome Extension
Pictures uploaded by friends and tagged with your name aren’t always included in Facebook’s official data export. To save these separately, Tagged Photo Exporter is a Facebook picture downloader for Chrome that collects accessible tagged images into a single page for bulk saving.
To use this extension:
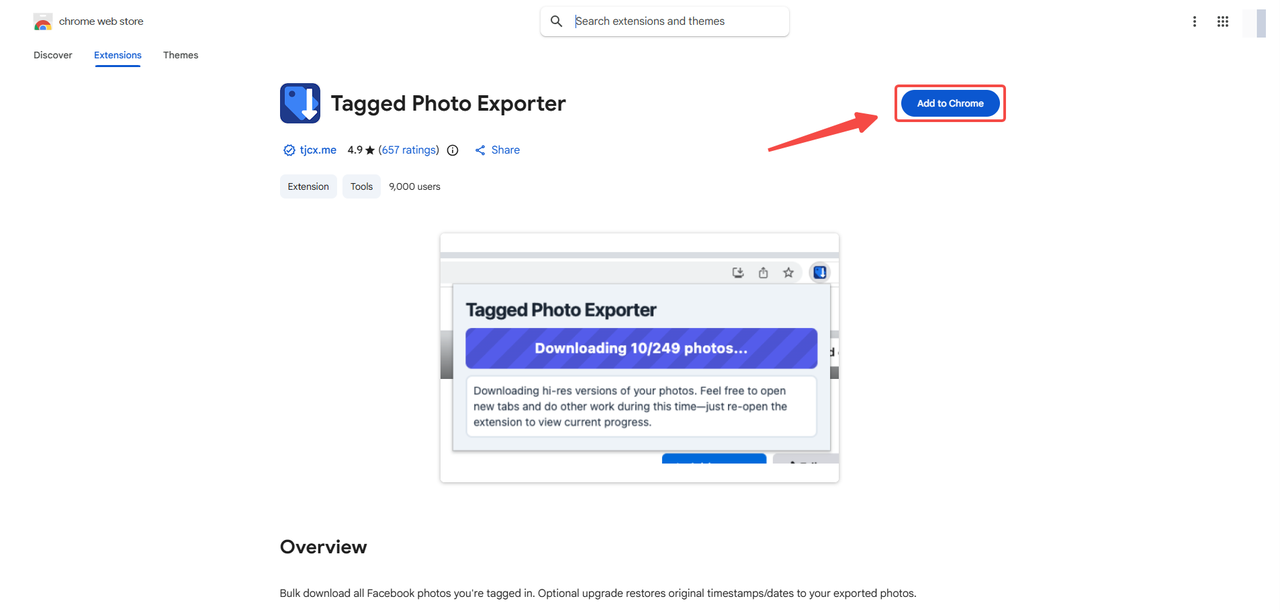
Step 1. Open the Tagged Photo Exporter listing in the Chrome Web Store and click Add to Chrome. Confirm the installation when prompted.
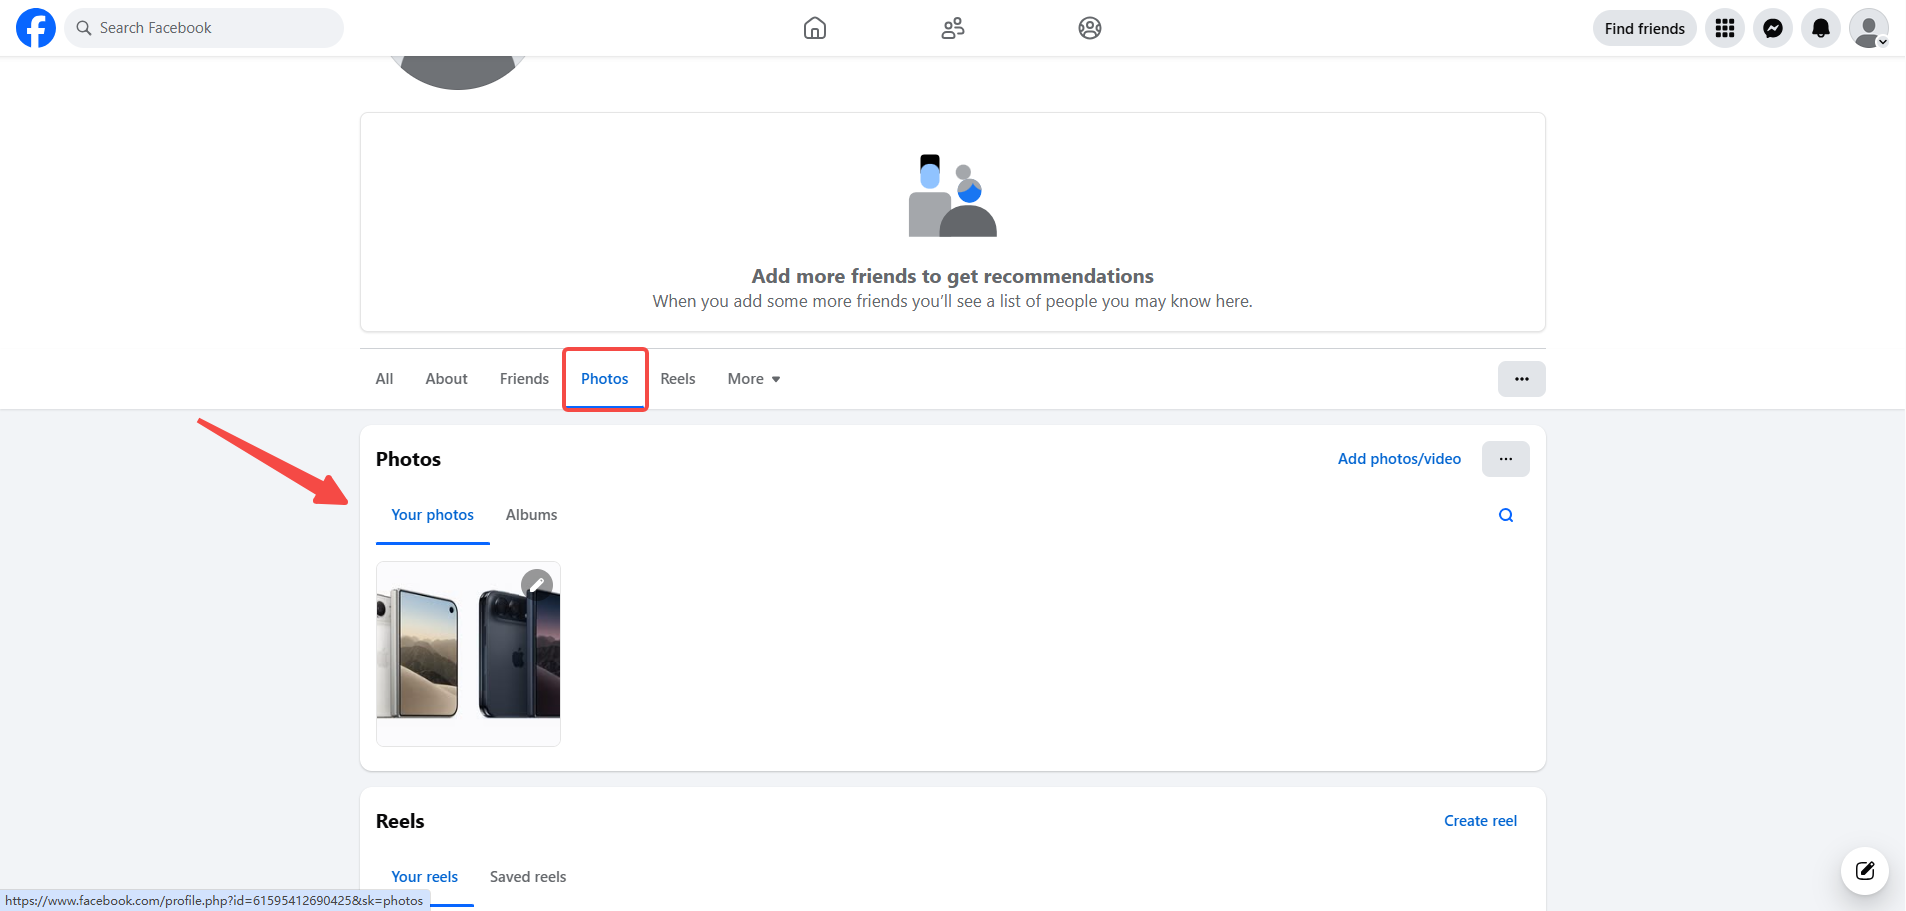
Step 2. Sign in to Facebook, visit your profile, and open Photos. Then select Photos of You to view pictures in which you’ve been tagged.
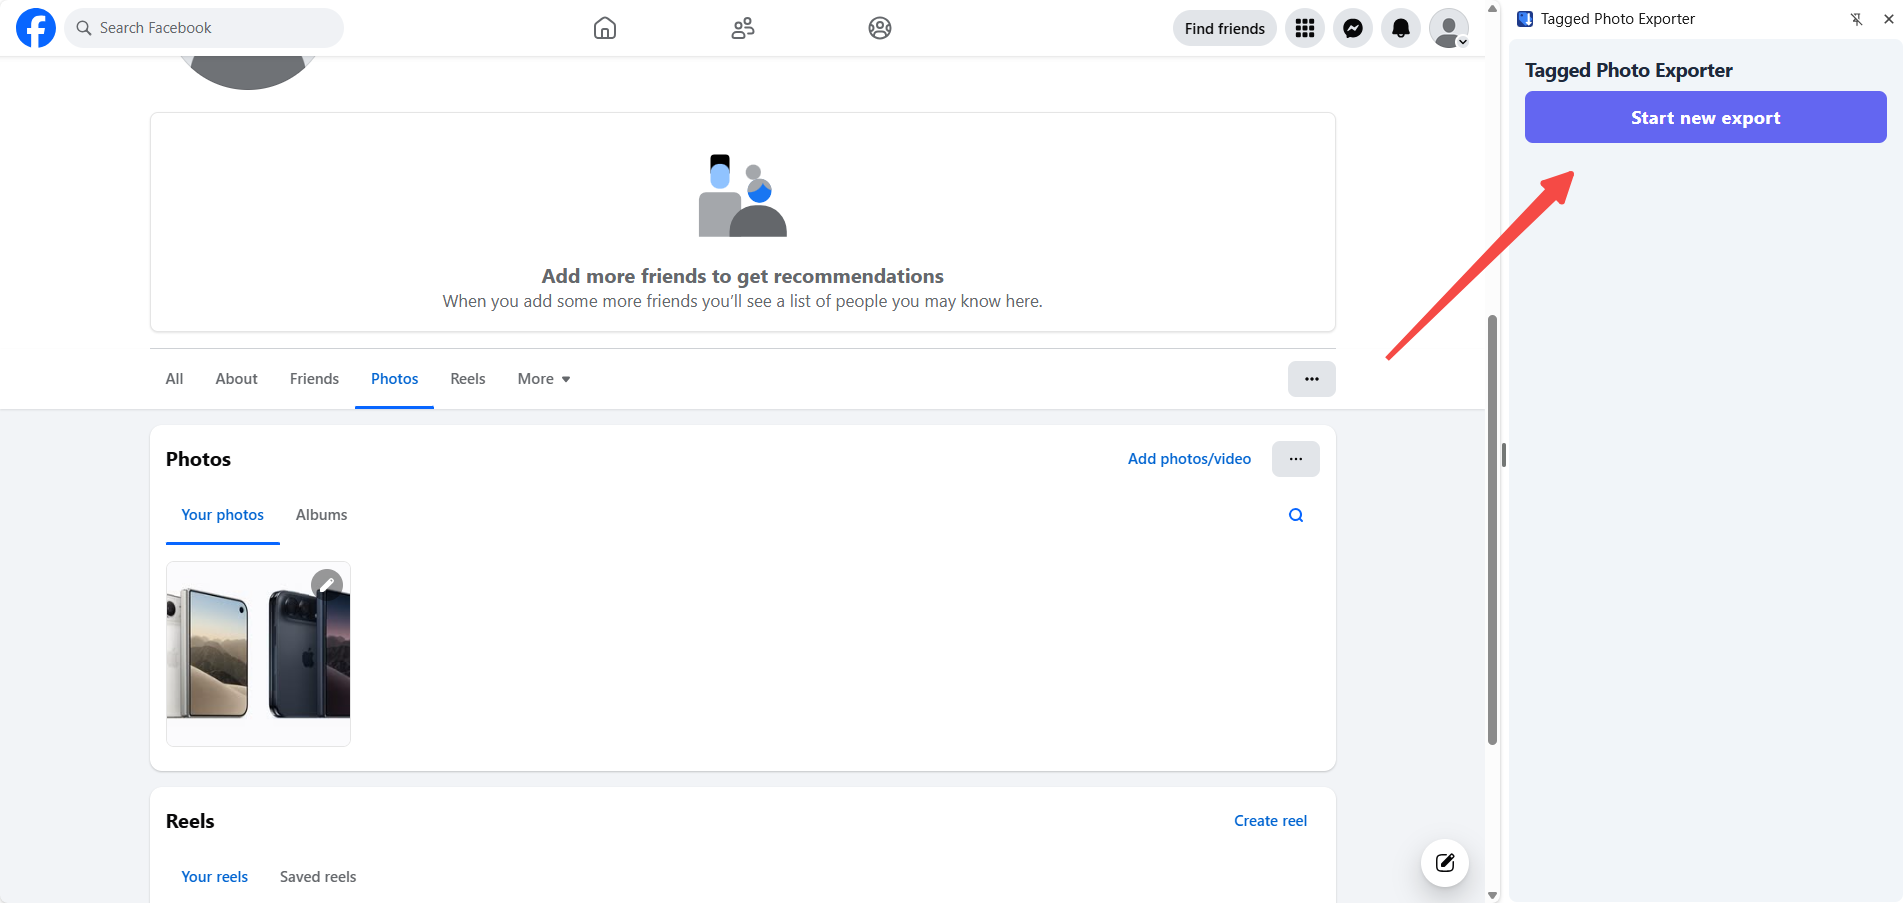
Step 3. Click the extension icon in Chrome’s toolbar and select Start export. The tool will begin collecting the available images. Larger collections can take longer to process.
Step 4. Once the process finishes, the results appear on a separate page. Press Ctrl + S on Windows or Command + S on Mac, then choose Webpage, Complete to save the content and associated files to your computer.
Basic exports are free. An optional $5 one-time upgrade restores estimated original dates using Facebook metadata, which can help when organizing older pictures.
Privacy note: This is a third-party extension, so its browser permissions deserve review before installation. The developer states that basic exports run locally, while the paid date restoration feature temporarily uploads images to private cloud storage. Changes to Facebook’s interface may also affect compatibility, and the tool cannot retrieve content you no longer have permission to view.
Inside Your Facebook Album Archive
You can download Facebook photos in bulk for free, but the resulting ZIP package isn’t a ready-to-view gallery. Here’s what you need to know about accessing and managing its contents.
- Extract the ZIP file. On Windows, right-click the archive and select Extract All. Mac users can double-click it to unpack the contents. On mobile devices, the Files app or a compatible file manager can handle extraction.
- Browse your collection. If you selected HTML, open
index.htmlin a browser to navigate the exported content. The actual image files may be stored in folders such asphotos_and_videos, although the directory structure can vary. - Understand the file format. HTML provides a browsable overview, while JSON contains structured data intended for software processing. Both formats can include the downloaded media.
- Check image quality and metadata. Choosing High quality doesn’t guarantee the original resolution. Some EXIF details, including camera information, timestamps, and location data, may be missing.
- Check for videos. Your archive may contain clips if they were included in the export request. Saving individual Facebook videos is a separate option for content you don’t need to export in bulk.
- Keep a local backup. Facebook’s completed export links expire after a limited period. Once the archive is saved, a second copy on another device or cloud storage can help protect your collection.
Missing Snapshots: Common Causes and Fixes
Your Facebook export may contain fewer pictures than expected, even after the download finishes successfully. This doesn’t necessarily indicate an error. Missing content can result from incorrect settings, incomplete files, or limits on what Facebook includes in your account data.
Here are the most common causes and their solutions:
- Wrong profile or date range. The request may cover only recent uploads or a different Facebook account. Check the selected profile and change the date range to All time before creating a new export.
- Incomplete information selection. Some images may be excluded because the relevant categories weren’t selected. Review the available content types and include Photos and videos, if listed. Otherwise, a broader export may be necessary.
- Incomplete download or extraction. A large ZIP package may fail to download completely due to connection or storage problems. Check its file size, make sure the transfer finished, and extract the entire archive before searching its folders.
- Content outside your account data. Deleted pictures are generally unrecoverable through Facebook’s export feature. Images uploaded by other users, even those you’re tagged in, may be excluded as well. In these cases, requesting a copy from the original uploader may be the only available option.
If the settings are correct but some items are still missing, comparing the extracted collection with what’s currently visible on your profile can help identify which content wasn’t included.
Before You Delete Your Facebook Account
The methods above explain how to save all photos from Facebook, but a completed export doesn’t guarantee that everything you want to keep has been preserved. Before deleting your Facebook account, a few final checks can help prevent permanent data loss:
- Check the collection. Compare the saved images with your Facebook albums, including older uploads and tagged pictures.
- Verify file integrity. Make sure the ZIP archive extracts successfully and individual files open without errors.
- Keep another copy. Store your backup on a separate device or cloud service to reduce the risk of data loss.
Once your account is permanently deleted, content that wasn’t saved beforehand may no longer be recoverable. It’s important to confirm that your backup is complete and accessible before proceeding.
Final Verdict
The methods above explain how to download all Facebook photos you’ve uploaded using the official export feature on a computer or phone. Individual albums can be saved separately where supported, while tagged pictures uploaded by others may require a Chrome extension. Each option serves a different purpose, and no single method guarantees that every image will be included. Checking the downloaded files and keeping a separate backup helps ensure your collection remains accessible.


2 comments